Wednesday, March 30, 2011

Square Mojo 184

As I said last week, this week I'll be using the technique I demonstrated at Workshop WOW! in Orlando for all the projects I submit online. You can find the tutorial for this technique by clicking here.
For this particular background, I used Daffodil Delight, Pumpkin Pie and Perfect Plum. I didn't do the criss-cross technique. Instead, I just made some vertical swirls and set one color next to the other.
I hope you like it!
Remember, don't hesitate to contact me if you have any questions or comments!
Enjoy!


Cardstock: Daffodil Delight (119683), Early Espresso (119686), Pumpkin Pie (105117), Very Vanilla (101650)
Designer Series Paper: Sweet Stitches (121781)
Stamp Sets: Fifth Avenue Floral (113734), Something To Celebrate (W 121897, C 121955)
Ink: Early Espresso (119670), VersaMark (102283)
Embossing Powder: Clear (109130)
Embellishments: Vintage Flowers Adornments (121879), Basic Pearls (119247)
Ribbon: Early Espresso 1/8" Taffeta (119959)
Punches: Scallop Trim Border (118402), 1-1/4" Circle (119861), Decorative Label (120907)
Tools: Heat Tool (100005)
Cool Stuff: Stampin' Pastels (120962)

Tuesday, March 29, 2011

The Paper Players Challenge #40

Here's my card for this week's Paper Players Challenge. I loved playing with this sketch!
For the pastel background technique I taught at Workshop WOW! in Regionals, click here.
Enjoy!


Cardstock: Basic Gray (121044), Melon Mambo (115320), Old Olive (100702), Whisper White (100730)
Stamp Set: Charming (116519)
Ink: Basic Gray (109120), Whisper White Craft Stampin' Spots (119719), Melon Mambo (115656)
Markers: Melon Mambo (121074), Old Olive (100079)
Embossing Folder: Square Lattice (119976)
Embellishments: Basic Rhinestones (119246)
Punches: Scallop Trim Border (118402)
Embosslits Die: Beautiful Wings (118138)
Tools: Color Spritzer Tool (107066)

Monday, March 28, 2011

SU! Regional and pastel background tutorial

On Saturday, I had the honor of presenting a Workshop Wow! at the Stampin' UP! Regional Event in Orlando. I was "sew" happy to be among the many talented presenters at the event!
I chose to present a "Make Backgrounds with Pastels Technique." Overall, I had a great time with old friends and got to meet new ones: Sharon, Nance, Fiorella, Rose-Ellen, Tina and Sylvia, thank you all for making Regionals a blast!
It was a day full of tips, prize patrols, laughs and presentations. I always enjoy going to these events because it refreshes my energy and I come back home full of ideas and the pleasure to have shared what I love.

Without further ado, here's the tutorial for the technique.
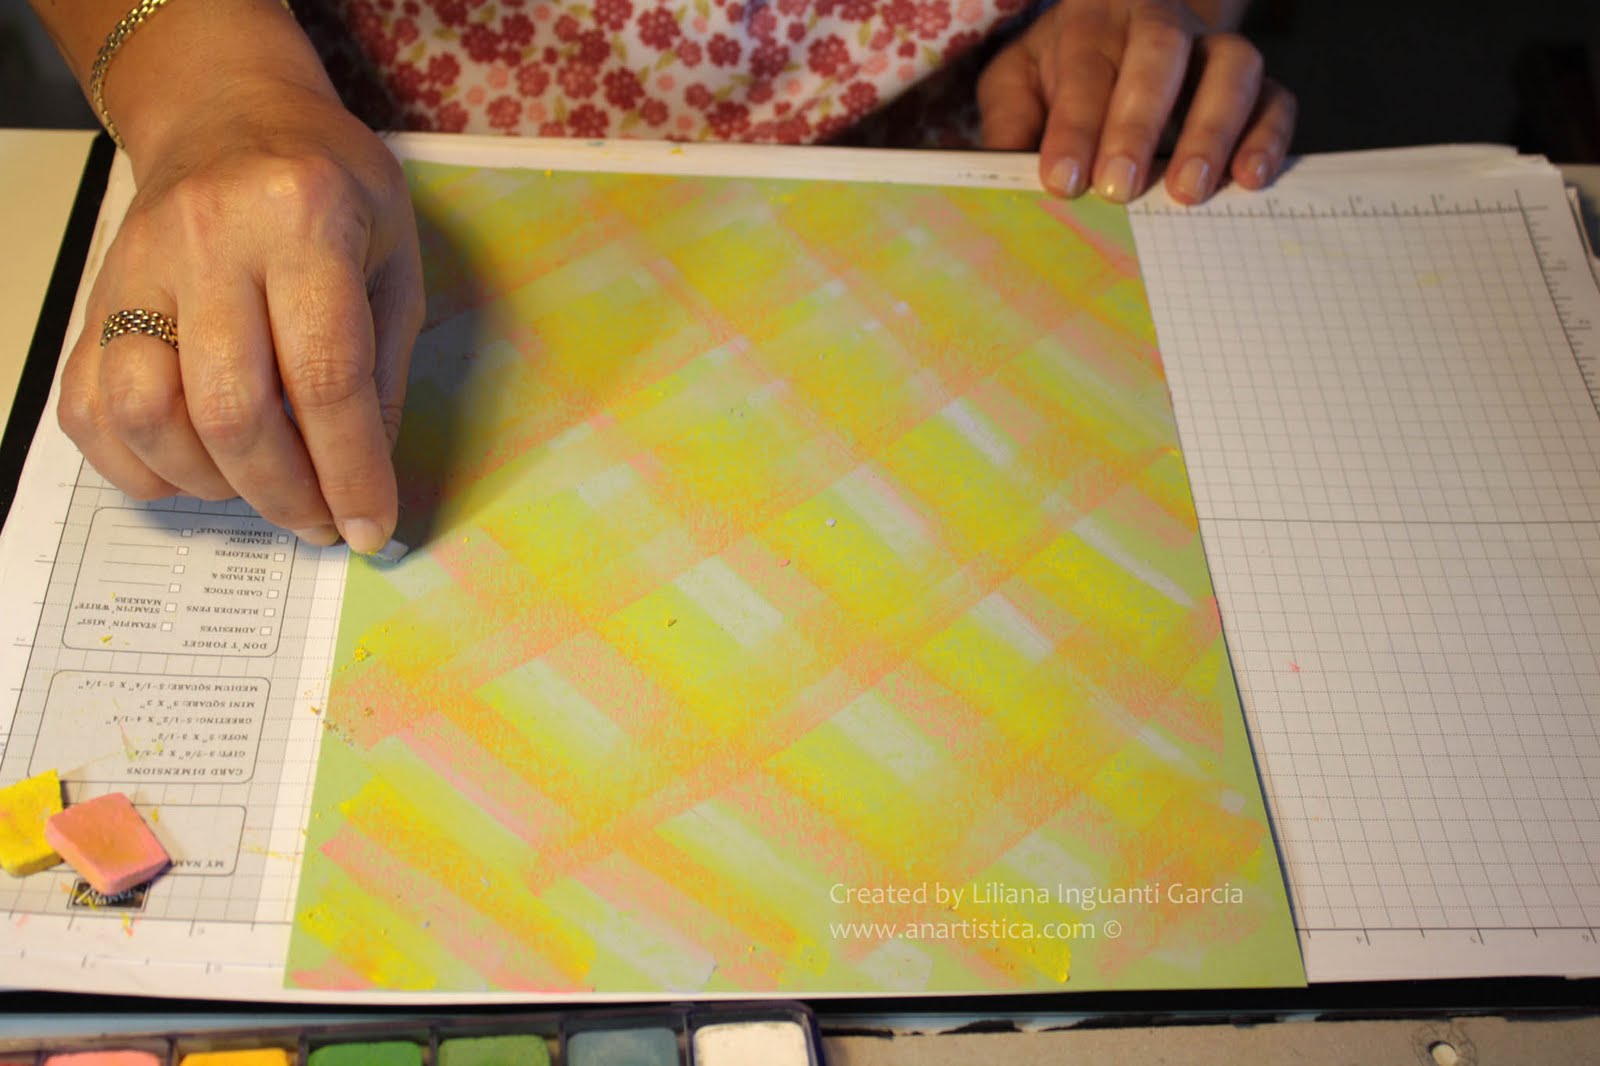
1. On a piece of cardstock, make diagonal lines on the paper using the pastels. For this background, I used a Certainly Celery cardstock and the Daffodil Delight pastel.
2. Next to your first set of lines, make two more sets with different colors. I used Regal Rose and Bashful Blue. Try to pick colors that will mix well together. For example: yellow and red (or rose) will give you an orange hue, rose or red and blue will give you a purple hue.
A little note on color: Don't mix the three primary colors (blue, yellow and red or rose) or you will get a muddy brown. If mixing primary with secondary, try and think of the colors involved so you don't end up with mud. For example, if mixing red and green, you will get mud because green has yellow and blue (hence, you're mixing the three primary colors). Just keep this in mind when choosing pastels for the backgrounds, and make sure the two colors that you're putting next to each other will mix well.
There's nothing wrong with getting a mud color if that's your intention. Just experiment with the colors you mix and see what you like.
3. Once you have your cardstock covered with lines in one direction, turn it around and make diagonal lines (in the same color order) so that you create a criss-cross background.
4. With your fingers, smooth out the lines and mix the adjoining colors, leaving the criss-cross effect. I use my fingers because that way I can control the pressure I use on the paper. If you want a really smooth design, use more pressure on your fingers. Otherwise, press your finger less on the cardstock to mix the colors slightly.
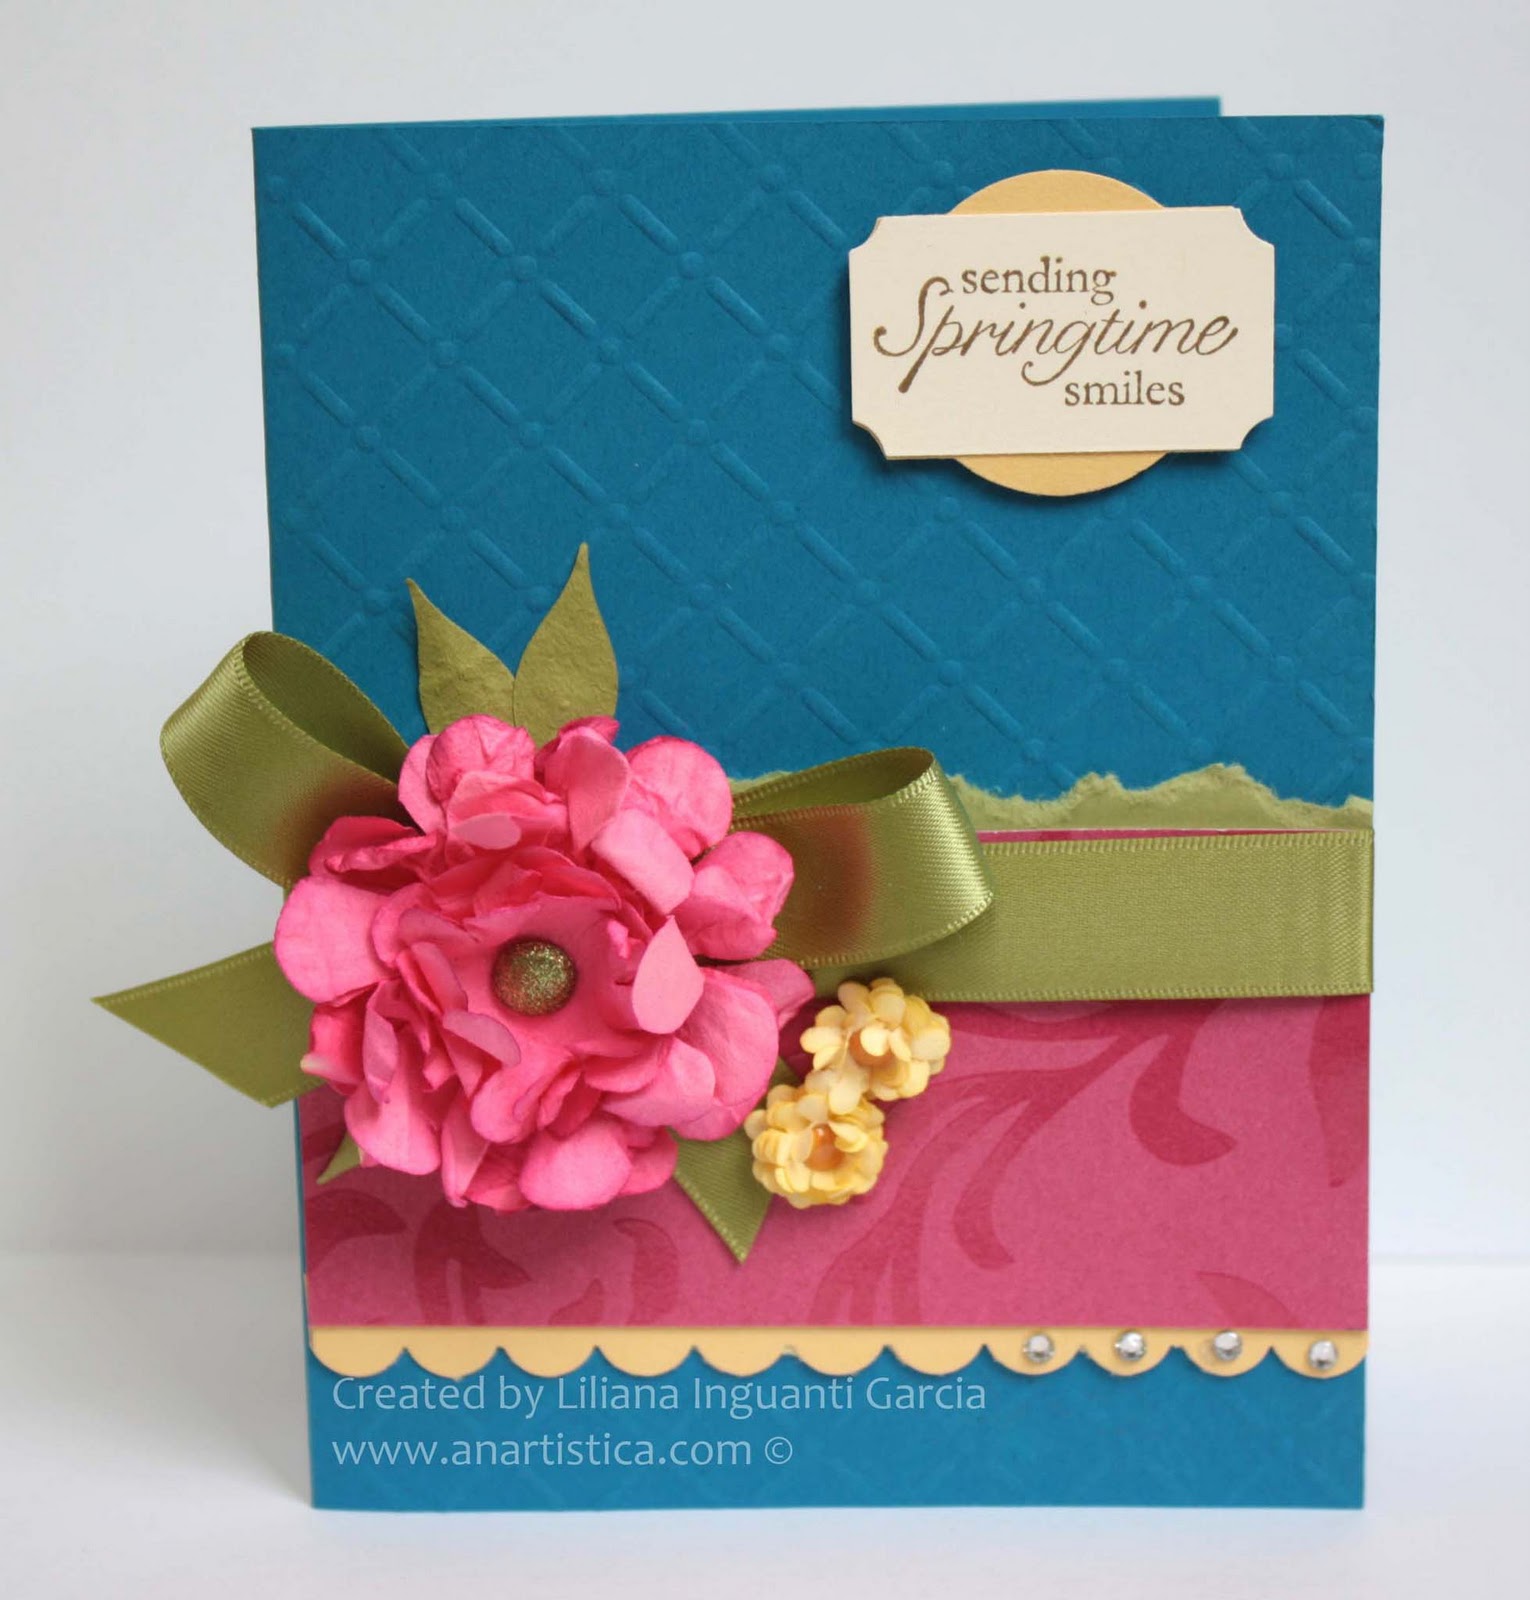
5. Once you have your desired look, clear emboss the design you like. In my case, I used the swirls of the Baroque Motifs Stamp Set.
6. Once you're done embossing, spray the cardstock with regular hair spray (or any fixative agent) in order to fix the pastels on the page. Let the cardstock dry and then it's ready to use!


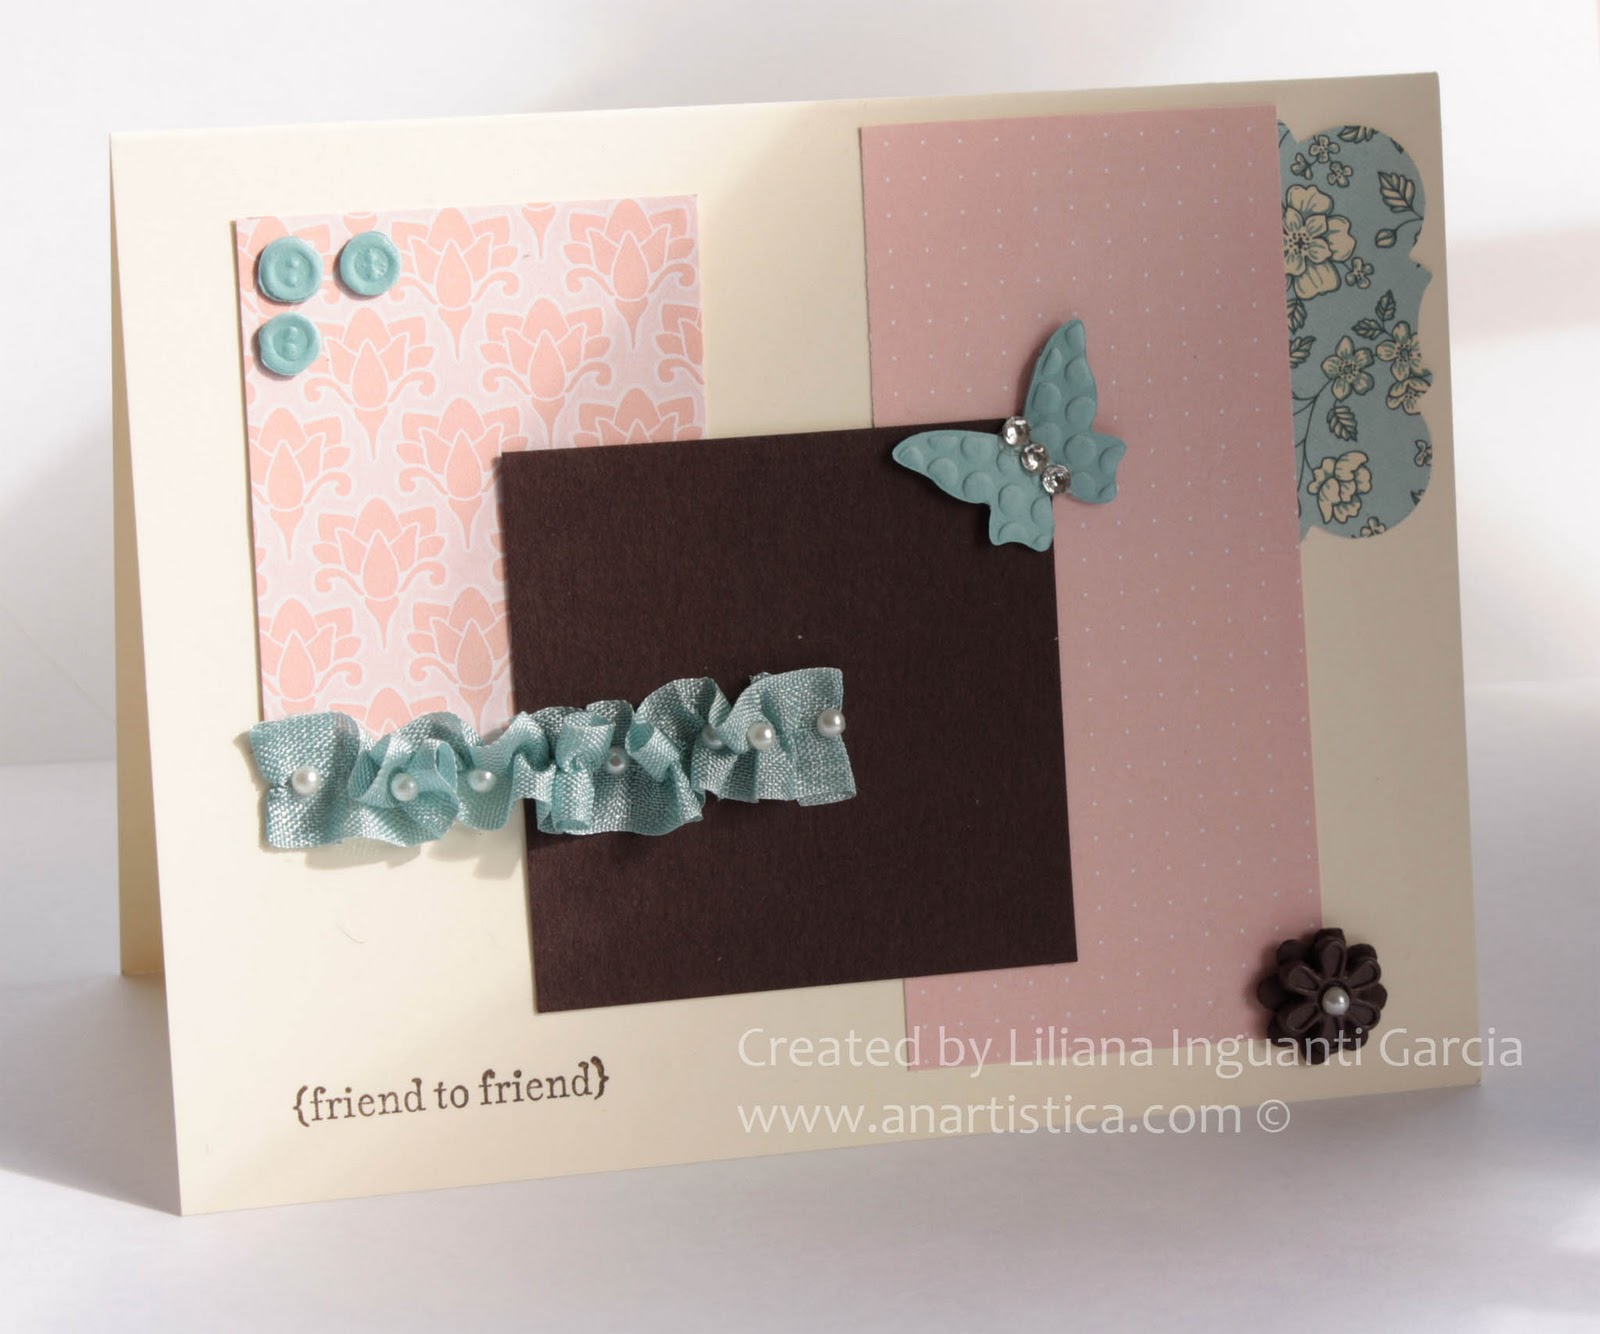
Below are some projects that I designed with this technique.


I hope you can experiment with colors and get creative with this technique! Don't hesitate to contact me for any questions you may have, or anything you need!
Enjoy!

Friday, March 25, 2011

Clean and Simple

This week's challenge at The Paper Players was a clean and simple sketch.
I love this sketch because it gives me a chance to showcase the technique I will teach at the Workshop Wow! at Regionals in Orlando tomorrow. I will be posting up how to create the pastel background on Monday, so be sure to stop by! I love this technique because it gives you the chance to create your own backgrounds and get creative.
Enjoy!


Cardstock: Certainly Celery (105125), Pink Pirouette (111351), Whisper White (100730)
Stamp Sets: Teeny Tiny Wishes (115370), Baroque Motifs (113490)
Ink: VersaMark (102283), Soft Suede (115657)
Pastels: Stampin' Pastels (120962) in Regal Rose, Daffodil Delight and Bashful Blue
Embossing Folder: Framed Tulips (121809)
Ribbon: Whisper White 1/4" Grosgrain (109025)

Tuesday, March 22, 2011

Bear Hugs For Pals Paper Arts 85

Believe it or not, I don't know how long I've had this bear stamp set sleeping in my drawer, and today it woke up! I had so much fun painting this little bear.
I looove to paint. For this bear, I used watercolor pencils and smoothed out the lines with the Aquapainter. If you don't have an Aquapainter, a regular small damp brush works well. Don't get the bristles too wet (just damp) when you're not working with watercolor paper. Regular cardstock is not prepared to receive a lot of water and it can break easily. On the contrary, if you use watercolor paper there is no limit on how much water you can put on it.
Bear hugs for you! Enjoy!


Cardstock: Sahara Sand (121043), Very Vanilla (101650)
Designer Series Paper: Patterns Stack-Subtles Collection (117152)
Stamp Set: Bear Hugs (116966)
Ink: Jet Black StazOn (101406)
Embossing Folder: Square Lattice (119976)
Embellishments: 3/16" Brads-Brights Collection (119740)
Ribbon: Old Olive 5/8" Satin (117292)
Punches: 1-3/8" Circle (119860), 1-3/4" Circle (119850)
Cool Stuff: Watercolor pencils (101879)

Monday, March 21, 2011

Mojo 183

I'm so excited because this week will be all about getting ready for the SU! Regional, which will take place in Orlando (just a four hour drive from my house!).
On Saturday, I'll be demonstrating a technique inspired by Gina K. that involves creating pastel backgrounds. I will post up the cards I created for the Workshop Wow! on Monday, so be sure to stop by and check out the technique!
Next week, I will be using the "background" technique on all the challenges I participate in; as the saying goes, "Practice makes perfect!" So I'll be practicing a lot!

I really like this layout for Mojo Monday.
Hope you like what I came up with!
Enjoy!

Don't forget:  Next Thursday, March 31st, will be the last day of the Sale-A-Bration promotion, so that gives you just over a week to place your order! Remember that for each $50 you spend in products, you get a free stamp set from the Sale-A-Bration Catalog. If you have any questions, don't hesitate to contact me!
If you want to receive all the benefits SU! has to offer, you can become a demonstrator during this promotion and you can get the Demonstrator Starter Kit 15% OFF! It's a good time of the year to become one of us!


Cardstock: Crumb Cake (120953), Baja Breeze (111352), Old Olive (100702), Very Vanilla (101650), Cajun Craze (119684)
Designer Series Paper: Elegant Soirée (117163)
Stamp Sets: A Flower For All Seasons (111592), Teeny Tiny Wishes (115370)
Ink: Baja Breeze (111833), Jet Black StazOn (101406)
Embossing Folder: Finial Press (115963)
Embellishments: Basic Pearls (119247)
Ribbon: Old Olive 5/8" Satin (117292)
Punches: 1-3/4" Scallop Circle (119854), 1-3/8" Circle (119860), 1-1/4" Circle (119861), Eyelet Border (119853)
Tools: Aquapainters (103954)
Cool Stuff: Watercolor pencils (101879)

Thursday, March 17, 2011

Happy Birthday with Plane and Simple

I copied this design (yes, copied exactly!) from Ann Schach (www.stampinchic.com). I am one of her followers and I simply love the cards that she creates. Sorry Ann, for copying your design (you can find her original design here), but I liked it so much that I wanted to replicate it.
Plane and Simple was a stamp set that I didn't really like, and because of this card I ended up buying it. That's why I wanted to post this card and thank Ann for sharing her creativity in her blog.
I'm not going to explain how I made it because I want to give Ann all the credit for this, so if you want to know how she made it just click here.
Thanks Ann, and you continue to be a source of inspiration.
Hope to see you at Convention!


Cardstock: Not Quite Navy (101722), More Mustard (100946), Very Vanilla (101650), Early Espresso (119686), Cherry Cobbler (119685)
Stamp Set: Plane & Simple (W 121903, C 121964)
Ink: Chocolate Chip (100908), Early Espresso (119670), Crumb Cake (121030)
Markers: Early Espresso (119680)
Embossing Folder: Texture Plates Kit #4 (114531)
Ribbon: Hemp Twine (100982)
Punches: Word Window (119857)
Tools: Color Spritzer (107066)
Cool Stuff: Mini Library Clips (109857), Sponge Daubers (102892)

Wednesday, March 16, 2011

The Paper Players Challenge #38

This week we have a color challenge at The Paper Players: Baja Breeze, Blushing Bride and Early Espresso + Very Vanilla.
For this card, I was inspired by a design I saw in the magazine Color Inspiration. What I liked about this design was its simplicity, only shapes and color combination, which was perfectly adaptable to the colors of this week's challenge.
Hope you like it!
Enjoy!


Cardstock: Very Vanilla (101650), Early Espresso (119686)
Designer Series Paper: Patterns Pack-In Color (121028; Hostess Level One), Springtime Vintage (121782)
Stamp Set: Teeny Tiny Wishes (115370)
Ink: Early Espresso (119670)
Embosslits Dies: Beautiful Wings (118138), Sweet Buttons (121813)
Embellishments: Basic Rhinestones (119246), Basic Pearls (119247), Flower Brads-Neutrals Collection (119730)
Ribbon: Baja Breeze Seam Binding (122331)
Cool Stuff: Magnetic Movers and Shapers-Punch Windows (115953), Crystal Effects (101055)

Tuesday, March 15, 2011

Mojo Friendship 182

I hope everybody has had a great weekend.
This week is a relaxing one here in South Florida because there is no school, it's Spring Break!
I continue using flowers in my cards, spring is in the air. The flowers in this particular card have been stamped in StazOn and painted with Aquapainters. To paint, I apply a little ink from the markers on a hard surface (such as the back of the Stamp-a-ma-jig). Then, with the bristles of the Aquapainters just damped, dip slightly in the ink and paint. It's very important that there isn't much water in the bristles because you're not painting on a watercolor paper; which means that if you soak the paper with water it's going to peel off and eventually break.
I hope you can practice painting with Aquapainters, it's so much fun!
Here's my card for this week's Mojo Monday.
Enjoy!


Cardstock: Very Vanilla (101650), Basic Black (121045), Daffodil Delight (119683), Cherry Cobbler (119685), Old Olive (100702)
Designer Series Paper: First Edition (121878)
Stamp Sets: Great Friend (113792), Elements of Style (118611)
Ink: StazOn (101406)
Markers: Daffodil Delight (119677), Riding Hood Red (120971)
Ribbon: Old Olive 5/8" Satin (117292)
Punches: 2-3/8" Scallop Circle (118874), 1-3/8" Circle (119860)
Cool stuff: Aquapainters (103954)

Stylish Blogger Award

My friend Geraldine Andrade gave me this award and it's such an honor! Thank you Geraldine for nominating my blog for this award!


The "rules" of the award are just to say eight things about you and to give it to other worthy blogs.
So, without further ado, here are eight things about me:

1. I have four beautiful and lovely children who help me a lot with my business.
2. I love cold weather!
3. I decorate cakes, model cake toppers, and love to cook.
4. I multitask a lot.
5. My dream is to have a huge house and to move to New England.
6. I love to teach and to share what I know.
7. I am friendly and outgoing.
8. I love love love to travel.

There are many, many talented artists and crafters, so it is very difficult for me to pick only a few to give this award to. Some of the blogs I follow have already received this award, so I am going to give this award to my dear friend Teresa Giordano. She is my upline and a very talented artist. She's given me her support in many many occasions and guided me through this journey of being an SU! Demonstrator.

The other person I'd like to give the Stylish Blogger Award to is Andrea Walford, whom I follow for all the wonderful tips and creativity she has.

Sunday, March 13, 2011

Spring for PPA84

Spring has sprung. What a beautiful time of year!

It's funny because here in Miami, there is no such season. It's either hot or hotter, lol. Although, some days out of the year, we get a cold front and the temperature drops to 60...how cold; and people start wearing gloves and scarves. Unbelievable, right?

I'm going to tell you something funny. I have a tree in my front yard that we planted a couple of years ago; it's still a young tree and it loses its leaves whenever the temperature drops a bit (just like during the fall months in other states). But here in Miami, when my tree drops its last leaf, it already has the buds that will grow during the hot season. Trees here completely skip the winter season!

Right now, the landscape here in Miami looks like fall, because trees are losing their leaves at this time of year (since the temperature dropped these past couple of days); and in a couple of weeks they will sprout their leaves as they get ready for the warm season; so they're never really without leaves cause once they fall they grow their buds almost instantly. How interesting, don't you think?

I hope you like my creation today for Pals Paper Arts. Enjoy!


Click here to order Stampin' UP! products online 24/7!

Cardstock: Rose Red (102544), Crumb Cake (120953), Wild Wasabi (108641), So Saffron (105118), Very Vanilla (101650)
Designer Series Paper: Nursery Suite Specialty (117165)
Stamp Set: Easter Blossoms (W 121905, C 122057)
Ink: Crumb Cake (121030), Rose Red (101778)
Embellishments: Paper Daisies (119243), Basic Pearls (119247)
Embosslits Die: Beautiful Wings (118138)
Ribbon: Early Espresso 5/8" Satin (119753), Daffodil Delight 1/8" Taffeta (119254)
Punches: Scallop Oval (119856), 1-3/4" x 7/8" Oval (119855)
Cool stuff: Sponge Daubers (102892)

Thursday, March 10, 2011

Spring Has Sprung-Paper Players #37

I was inspired to create this design from the cover of the magazine Color Inspiration. I loved the color combination so much that I adapted everything to SU! colors and I came up with this card. I thought it would be nice to submit it to this week's Paper Players Challenge: Spring Has Sprung!
I hope you like it!


NOTE: Because I wanted puffy flowers, I created these ones out of Paper Daisies (119243).

First, I prepared the dye. To do this, fill up half of a container with water (the container doesn't have to be too big; you can use the containers where the SU! brads or buttons come in). Add some drops of color to the water. In my case, I used Melon Mambo and So Saffron Classic Ink Refills. The intensity of the color depends on your taste, really. If you like a soft color, add only a couple of drops (one or two). If, on the contrary, you prefer an intense color, add more drops (four or five should be enough to create a rich color, but you can experiment and see what you like).

After the dye is ready, submerge the paper daisies in the dye ONE BY ONE. For the pink flower in my card, I used four big and three medium paper daisies. For the yellow ones, I used six small paper daisies on each one. Submerge one daisy at a time and lay it on a very absorbent tissue paper to absorb the water. Do this for each daisy. Once they are somewhat dry but still damp, frill the daisies and open them back up and let them dry completely.

You've now created the texture for the flowers. Once the flowers are completely dry and ready to assemble, glue them together. I glued them on top of each other using Mini Glue Dots. After, pierce the center of the flowers and put in a brad. Finally, arrange the petals the way you like. Et voilà! The flowers are ready for your card!

Don't hesitate to contact me for any questions you may have!
Enjoy!

Click here to order Stampin' UP! products online 24/7!

Cardstock: Pacific Point (111350), Old Olive (100702), So Saffron (105118), Very Vanilla (101650)
Designer Series Paper: Sweet & Sour Specialty (117390)
Stamp Set: Easter Blossoms (W 121905, C 122057)
Ink: Melon Mambo (115662), So Saffron (105225), Soft Suede (115657)
Embossing Folder: Perfect Details (115962)
Embellishments: Paper Daisies (119243), Brights Glimmer Brads (121006), 3/16" Brads-Subtles Collection (119738), Basic Rhinestones (119246)
Ribbon: Old Olive 5/8" Satin (117292)
Punches: Scallop Edge Border (119882), Designer Label (119862)

Tuesday, March 8, 2011

Springtime Smiles

I learned the technique I used on this card from Splitcoastampers. It is called "Faux Pressed Flowers." It is fun to do and I encourage you to try it. You can follow the link to see a step by step tutorial, but I will explain here how I made mine.

First, I colored the flowers with daubers using Cajun Craze and Marina Mist. I let them dry (which is pretty fast) and then stamped the branch on the cardstock. I positioned the flowers on the branches, glued the flowers using 2-way Glue, and embossed the cardstock. Try to use an embossing folder that has a somewhat tight design...if the design is spread out too much you may risk the flowers not getting embossed!
Once the paper is embossed, the flowers that were pressed in the embossing process get settled in place and they look like they are part of the design of the paper.

For this particular card, I was inspired by colors I saw in Home Magazine.
Enjoy!


Click here to order Stampin' UP! products online 24/7!


Cardstock: Whisper White (100730), Marina Mist (119682), Crumb Cake (120953), Cajun Craze (119684)
Stamp Set: Easter Blossoms (W 121905, C 122057)
Ink: Garden Green (102272), Old Olive (102277), Marina Mist (119668), Cajun Craze (119671)
Embossing Folder: Petals-a-Plenty (116824)
Embellishments: Basic Pearls (119247)
Ribbon: Old Olive 5/8" Satin (117292)
Punches: Scallop Oval (119856), 1-3/4" x 7/8" Oval (119855)
Tools: Two-Way Glue Pen (100425)
Cool Stuff: Paper Daisies (119243), Sponge Daubers (102892)